*IMPORTANT* - YOU DO NOT NEED TO CREATE A FACEBOOK APP IN ORDER TO UPLOAD TO FACEBOOK.
BY DEFAULT, YOUR PHOTOS WILL BE SHARED BY OUR GENERIC “EVENT PHOTOS” APP, WHICH APPEARS ON EACH POST, LIKE THIS:

The only reason to go through the process described below is to change the text that reads "Event Photos" to "(your app name)" on the posts that your guests share. There is no other benefit to using a custom app.
Please also keep in mind that, regardless of whether or not you create your own app, clicking the name of your app in a Facebook post, will still direct the user to login.photopartyupload.com and not your own website. This is because the photos are, technically, coming from LA Photo Party, and that cannot be altered.
If you or your clients still wish to change the text, the following step by step guide will enable you to successfully create a Facebook Graph API App and submit it for approval. Please note that approval is not guaranteed, but by following these steps, your chances of approval are significantly improved.
HOW TO CREATE A FACEBOOK GRAPH API APP
AND SUBMIT IT FOR APPROVAL
Overview: The following steps will walk you through the creation of a Facebook App and everything needed to submit it for approval. Apps take 5-7 days for approval. If your App is rejected, please contact us for further assistance.
You must be logged into a Facebook account that has developer access in order to complete this process.
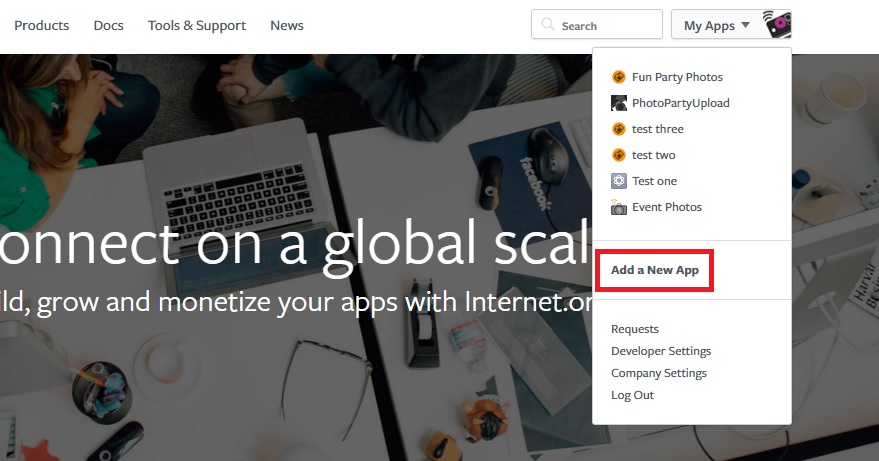
Log into Facebook and go to developers.facebook.com then click on My Apps > Add a New App
2.
In the window that opens, enter your desired company app name in the first field and the contact email you prefer in the second.
Most likely, it will already be auto-filled with the email address connected to your Facebook account.
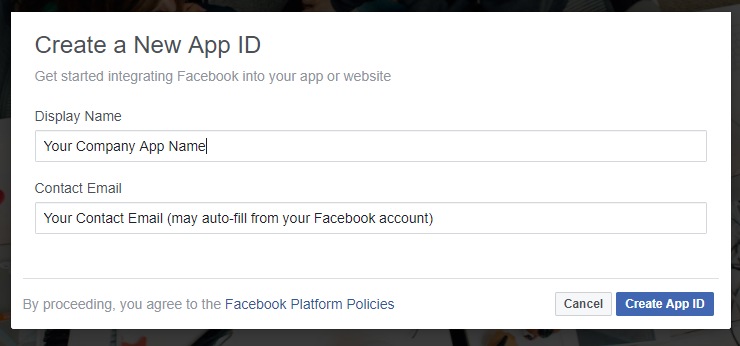
Be sure to review the Facebook Platform Policies documentation linked at the bottom of the window.
When you are done, click the Create App ID button in the lower-right hand corner to proceed.
You may be prompted to complete a Security Check via captcha code or other method. Please do so, and continue as prompted.
You should now be logged into the profile for your new App, and will likely be looking at the Add Product + Page by default. You don’t need to be on this page for our purposes, so...
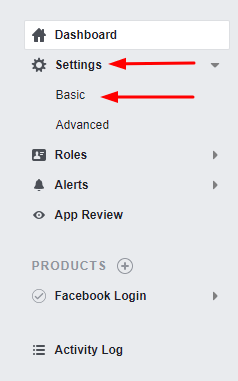
3.
Click on Settings > Basic in the left menu
4.
Enter the Settings for your App
You should now be looking at a page with some blank, some auto-filled fields like this:

We’ve put some red boxes around the fields that you will want to fill in, and here are some instructions on how to do it:
Display Name: This is where you’ll put the name of your App. It is likely already auto-filled when you arrive on this page.
Contact Email: Again, likely already auto-filled from your Facebook account, but your contact email goes here.
Privacy Policy URL: We’ve already got a Privacy Policy for you. Copy and paste the following link into that field:
https://support.photopartyupload.com/support/solutions/articles/5000768727-photo-party-upload-facebook-app-privacy-policy
Be sure to check it over first so that you’re familiar with its contents, as well.App Icon: Click here to upload any 1024 x 1024 image you would like to use for your App Icon. We have a generic one available for you to use, if you like, which you are free to download from here.
Choose a Category: You can select a category for your app. We recommend “Entertainment.”
So, when you’re all done with this process, the page should looks something like this (with your own details, of course):

Now, before you leave this page, there are a couple more steps...
5.
Add Platforms: Website and iOS
Below the area where you’ve been entering the information for Step 4, there’s a long button that says + Add Platform -- like this:
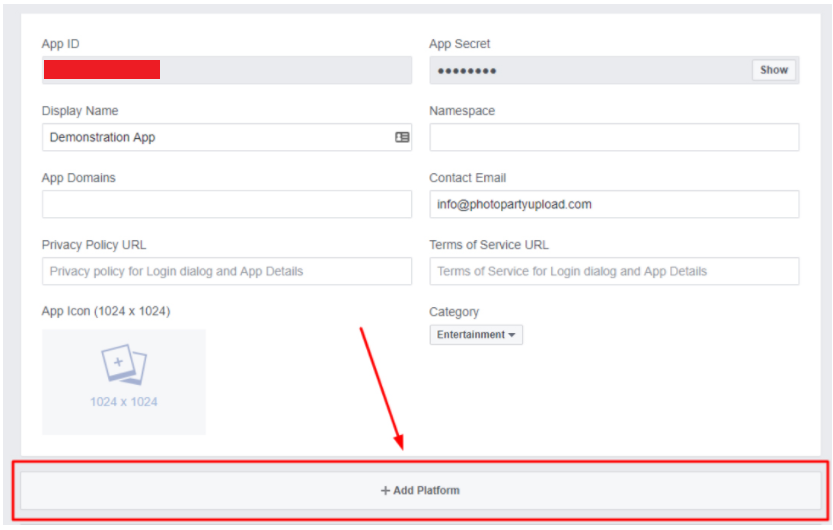
Click that button, and from the window that pops up, select Website:

This will add another area with a field where you can enter a website URL.
Enter this address:
http://login.photopartyupload.com
Like this:

Next Click the + Add Platform button again, and this time, select iOS:

Yet another area will be added below. In the field that reads Bundle ID enter the following:
com.venuiti.Photo-Party
Once you’ve clicked out of that field (or hit Tab) it should look something like this:

Now, click on Save Changes in the bottom right:

That’s it for the Basic Settings.
Now, we begin the App Approval submission process…
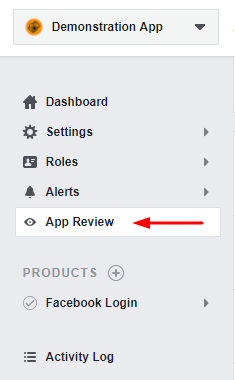
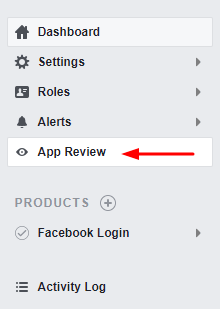
6.
Click on App Review in the left menu
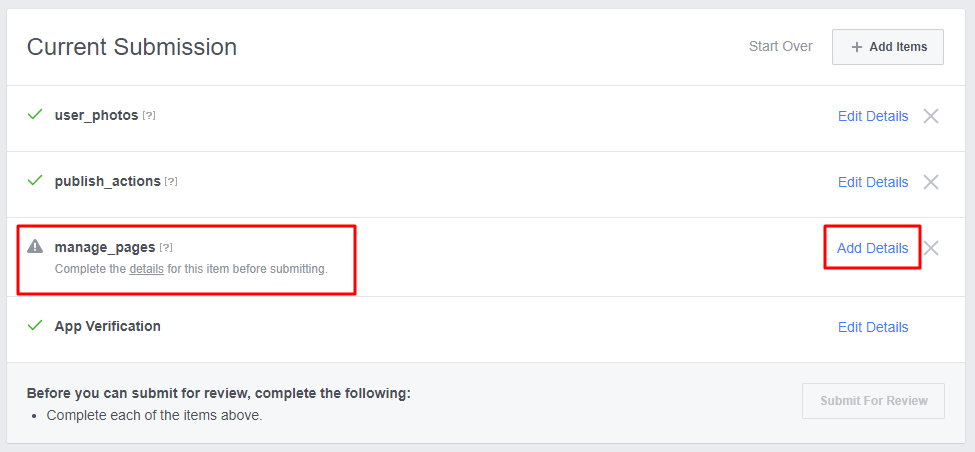
For a new app, you will need to click the “Start a Submission” button in the “Submit Items for Approval” pane.

You will then be prompted to select the items you want to include in this submission.
Select manage_page, publish_actions, and user_photos:

Click the “Add 3 Items” button at the bottom of that window.
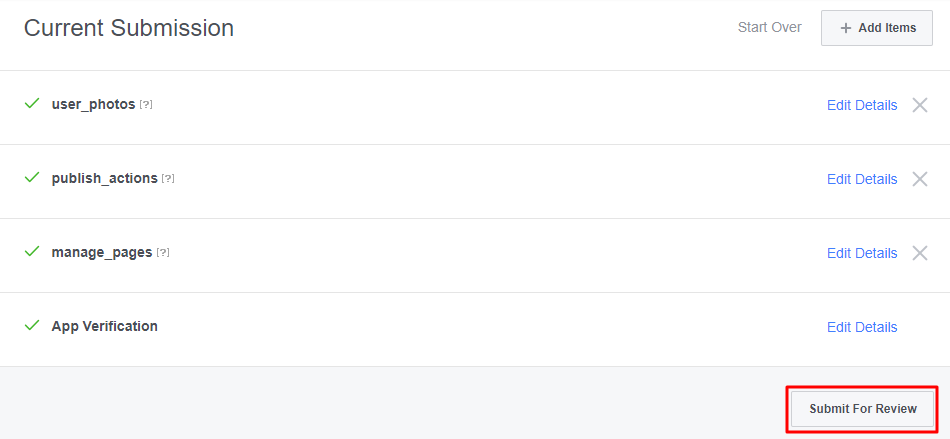
You will now see these options listed above “App Verification” in the Current Submission section.
Add Details for each of these three items and adjust each per the instructions below...
6a.
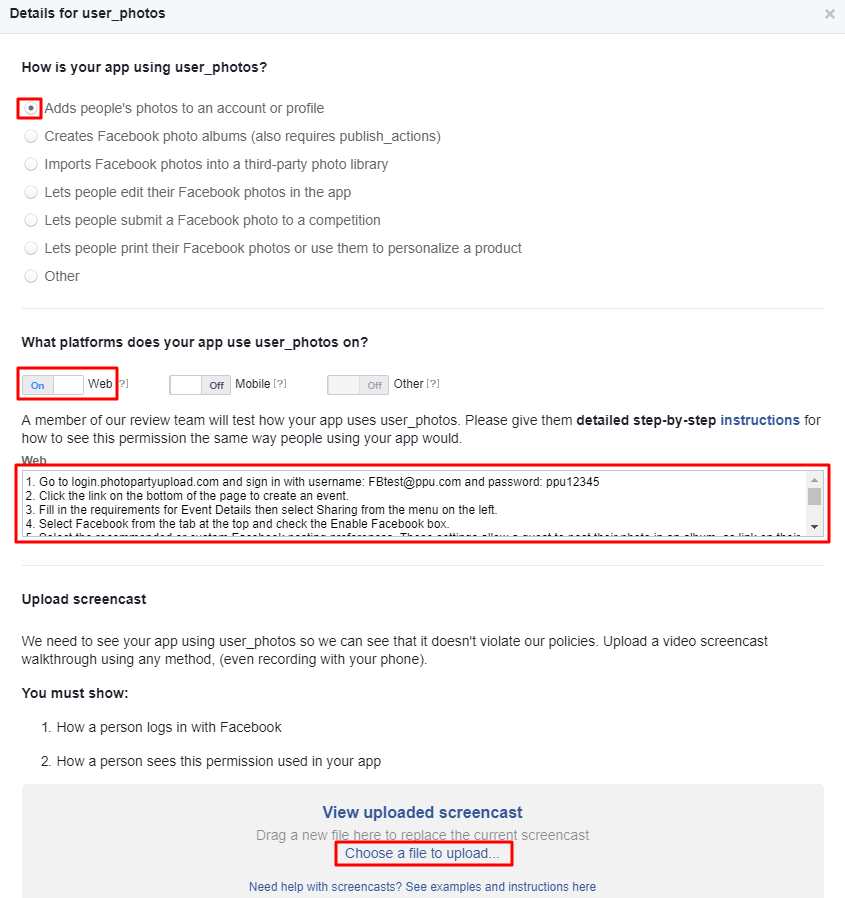
For user_photos:
Select the first option: Adds people's photos to an account or profile.
Under What platforms does your app use user_photos on? set Web to "On."
Copy and paste this info into the box at the bottom:
1. Go to login.photopartyupload.com and sign in with username: FBtest@ppu.com and password: ppu12345
2. Click the link on the bottom of the page to create an event.
3. Fill in the requirements for Event Details then select Sharing from the menu on the left.
4. Select Facebook from the tab at the top and check the Enable Facebook box.
5. Select the recommended or custom Facebook posting preferences. These settings allow a guest to post their photo in an album, as link on their wall, or both. You can also choose to upload to a Facebook fan page.
6. Under Custom Facebook Posting, enter the name of the Facebook album (if album is selected) and toggle friend tagging.
7. If Fan Page is selected, choose whether to upload all photos, start uploading automatically, upload all individually shared photos, or replace all individually shared photos with Fan Page posts. You can also select whether to upload videos as well as photos. You will also connect to Facebook and select the fan page you have permission to upload to.
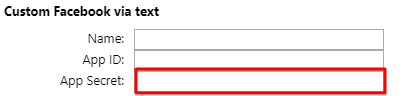
8. Select Sharing from the menu on the left and select the Graphics tab at the top, and check the “Remove Photo Party Upload Branding” box. Then you can enter the Name, App ID, and App Secret for the Facebook App in the Custom Facebook via text box.
9. In the Data Collect tab of the Options section, you can check the “Enable Collect Emails” box and “Add disclaimer” box to enter disclaimer text that will alert guest’s to the selected Facebook Fan Page settings.
10. Select Submit to save the event settings.
11. At the event the guests will see a list of photos or videos that they've taken. They will select whichever ones they like and then tap the Facebook button.
12. If Facebook fan page is enabled they will see the previously entered disclaimer asking permission to upload photos to the fan page. They must agree to proceed.
13. The guest will be prompted to login to Facebook using their credentials.
12. They will see their photo(s) and if it is enabled they will be given the option to tag friends.
14. The guest will have the option of entering a caption for their photos.
15. The guest will tap the "Post to Facebook" button posting their photos to Facebook in a manner dependent on the event settings. This requires the user_photos permission.
16. The guest will then be automatically logged out of Facebook and the next guest will be able to select their own photos or videos.
Under Upload screencast, upload this video file (you will need to download this first): https://www.dropbox.com/s/30i6g1n2xcpk537/UPDATED_FB%20App%20Demo.mp4?dl=0
The window should look like this:
Click Save at the bottom.
6b.
For publish_actions:
Check the boxes for each line-item above section titled How is your app using publish_actions? (i.e. “My app does not auto-populate…”, “My app does not use the Facebook Feed Dialog…” etc.)
Under How is your app using publish_actions? select the first option: Lets people post to Facebook using a custom composer.
Under What platforms does your app use publish_actions on? switch Web to "On."
Copy and paste this info into the box at the bottom:
1. Go to login.photopartyupload.com and sign in with username: FBtest@ppu.com and password: ppu12345
2. Click the link on the bottom of the page to create an event.
3. Fill in the requirements for Event Details then select Sharing from the menu on the left.
4. Select Facebook from the tab at the top and check the Enable Facebook box.
5. Select the recommended or custom Facebook posting preferences. These settings allow a guest to post their photo in an album, as link on their wall, or both. You can also choose to upload to a Facebook fan page.
6. Under Custom Facebook Posting, enter the name of the Facebook album (if album is selected) and toggle friend tagging.
7. If Fan Page is selected, choose whether to upload all photos, start uploading automatically, upload all individually shared photos, or replace all individually shared photos with Fan Page posts. You can also select whether to upload videos as well as photos. You will also connect to Facebook and select the fan page you have permission to upload to.
8. Select Sharing from the menu on the left and select the Graphics tab at the top, and check the “Remove Photo Party Upload Branding” box. Then you can enter the Name, App ID, and App Secret for the Facebook App in the Custom Facebook via text box.
9. In the Data Collect tab of the Options section, you can check the “Enable Collect Emails” box and “Add disclaimer” box to enter disclaimer text that will alert guest’s to the selected Facebook Fan Page settings.
10. Select Submit to save the event settings.
11. At the event the guests will see a list of photos or videos that they've taken. They will select whichever ones they like and then tap the Facebook button.
12. If Facebook fan page is enabled they will see the previously entered disclaimer asking permission to upload photos to the fan page. They must agree to proceed.
13. The guest will be prompted to login to Facebook using their credentials.
12. They will see their photo(s) and if it is enabled they will be given the option to tag friends.
14. The guest will have the option of entering a caption for their photos.
15. The guest will tap the "Post to Facebook" button posting their photos to Facebook in a manner dependent on the event settings. This requires the user_photos permission.
16. The guest will then be automatically logged out of Facebook and the next guest will be able to select their own photos or videos.
Under Upload screencast, upload the same video: https://www.dropbox.com/s/30i6g1n2xcpk537/UPDATED_FB%20App%20Demo.mp4?dl=0
The window should look like this:

Click Save at the bottom.
6c.
Under How is your app using manage_pages? select the second option:
Lets people manage a Page using the app.Copy and paste this info into the box at the bottom:
1. Go to login.photopartyupload.com and sign in with username: FBtest@ppu.com and password: ppu12345
2. Click the link on the bottom of the page to create an event.
3. Fill in the requirements for Event Details then select Sharing from the menu on the left.
4. Select Facebook from the tab at the top and check the Enable Facebook box.
5. Select the recommended or custom Facebook posting preferences. These settings allow a guest to post their photo in an album, as link on their wall, or both. You can also choose to upload to a Facebook fan page.
6. Under Custom Facebook Posting, enter the name of the Facebook album (if album is selected) and toggle friend tagging.
7. If Fan Page is selected, choose whether to upload all photos, start uploading automatically, upload all individually shared photos, or replace all individually shared photos with Fan Page posts. You can also select whether to upload videos as well as photos. You will also connect to Facebook and select the fan page you have permission to upload to.
8. Select Sharing from the menu on the left and select the Graphics tab at the top, and check the “Remove Photo Party Upload Branding” box. Then you can enter the Name, App ID, and App Secret for the Facebook App in the Custom Facebook via text box.
9. In the Data Collect tab of the Options section, you can check the “Enable Collect Emails” box and “Add disclaimer” box to enter disclaimer text that will alert guest’s to the selected Facebook Fan Page settings.
10. Select Submit to save the event settings.
11. At the event the guests will see a list of photos or videos that they've taken. They will select whichever ones they like and then tap the Facebook button.
12. If Facebook fan page is enabled they will see the previously entered disclaimer asking permission to upload photos to the fan page. They must agree to proceed.
13. The guest will be prompted to login to Facebook using their credentials.
12. They will see their photo(s) and if it is enabled they will be given the option to tag friends.
14. The guest will have the option of entering a caption for their photos.
15. The guest will tap the "Post to Facebook" button posting their photos to Facebook in a manner dependent on the event settings. This requires the user_photos permission.
16. The guest will then be automatically logged out of Facebook and the next guest will be able to select their own photos or videos.
Under Upload screencast, upload the same video:
https://www.dropbox.com/s/30i6g1n2xcpk537/UPDATED_FB%20App%20Demo.mp4?dl=0
The window should look like this:

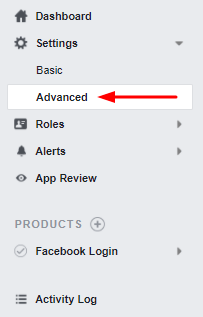
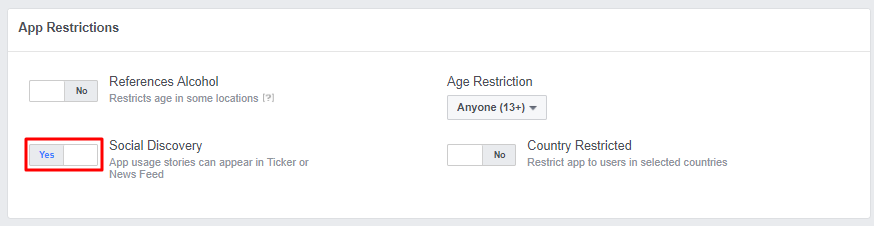
7.
Click on Settings > Advanced in the left menu...
Under the App Restrictions section, set Social Discovery to "YES:"
Open login.photopartyupload.com And create a test event using the app details from your dashboard:
In the Facebook tab of the Sharing section, check Enable Facebook. In the Graphics tab of the Extras section, check Remove Photo Party Upload Branding.
In the box that appears, enter the name of the App in the Name field.
Then copy the App ID from the top of the App Dashboard and paste it in the App ID field in the Event Manager:


Back in the App Dashboard, click on Settings > Basic in the left menu:

In the Security section, copy the App ID and App Secret:

Paste them in the corresponding fields in Event Manager:
Submit your event.
8.
Select your Event on the Photo Party Upload Helper app and use the kiosk or PBU to share a test photo to Facebook using your app.
Note: Since your app is still not approved, you must share the photo to the same account that created the app!
Now that you have tested your app you can submit it. Go to the App Review section...
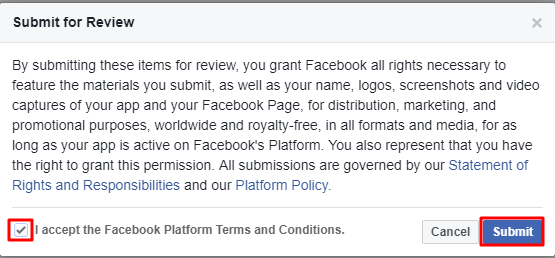
...and click Submit for Review:
Check the box to accept the Facebook Platform’s Terms and Conditions, then click Submit:
Most submissions take 2 business days for review. If all goes well, your App will be approved.

If for some reason your App is not approved, or you need help with this process, please feel free to call us at 323-473-4883 or email us at info@photopartyupload.com
You're Finished!
Now that your App is approved, you can use the App ID, App Secret, and Client Token in the Remove Photo Party Upload Branding feature and/or Upload To Facebook Fan Pages. The Client Token can be found in the Settings > Advanced page:


The Client Token can then be pasted into the App Access Token field in the Facebook Fan Page box in the Facebook page of Event Manager’s sharing settings:

Thank you!